Thursday, June 18, 2009

Batteries, Gauges and Heater Core

Now your pretty much up to date.
It is now mid June ... and the projects i've been working on this month are:


The Battery Boxes:
Turning 12 of these 7.5Ah 12Volt batteries

Into This

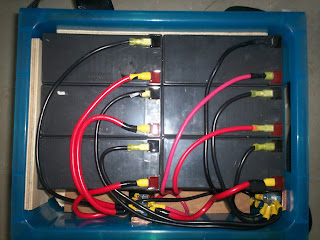
A 12V 90Ah Battery Box ...

The Idea is to have 13 of these Battery Boxes wired in series to create 156Volt

This part of the project is turning into a real chore with charging of the individual batteries, testing, endless wire cutting and crimping, modifying of the boxes, timber insert cutting ... etc...

I'm finding nearly every second of these used batterys to be ok ... so for now a couple of hundred dollars on cable and boxes is a better option than spending a few thousand for a new set of batteries.


Gauges, Switches and Wiring Harness:


Mounted on a plywood face plate, I have installed the LCD Meters and an array of illuminated switches which will control the gauges, main power, heater core, power steering pump and vacuum pump. i have also wired all this to a detachable plug and a custom wiring harness.


Heater Core:

Because the ICE no longer supplies hot water for the cabin heater, an alternate electric heat source needs to be installed.


Pictured here is the original 300zx "under dash" heater core and a timber frame i made with the same dimensions.

Thanks to kiwiev.com for the idea ... which is to use a 1600Watt ceramic heater core from a $20 fan heater.

Although used with 240V AC, these heater cores will heat to 100 degrees in seconds when connected to high voltage DC (156V in my case) ... The heater core will be not only activated by a switch on the dash but also fed from the cabin fan power. This way the heater core will only be activated with the dash switch on and the cabin fan running ... (see kiwiev.com for a better explanation)

Pictured here is my second attempt at this heater core. I still have more testing that needs to be done before I will feel safe about mounting this back under the dash.

Motor Coupler and Adapter Plate

End of May 2009 / Start of June 2009,

I spent a day driving around Brisbane chatting with various engineering companies about the fabrication of the motor/gearbox shaft coupler and adapter plate.

Many didn't know how to handle the "splined" shaft off the engine to fabricate a suitable coupler.
But I did find 2 companies before long that could help.

Winch Engineering at Rocklea & Extensive Engineering at Capalaba.
As both engineering companies quoted about $1200, I ended up taking the motor, gearbox and clutch plate into Extensive Engineering purely because they were closer to home ...
Hopefully they will have something for me by end of June.

All the Small Stuff

I also began sourcing the smaller electronic components I would require for the build

Contactor ... Tyco EV200 ... Rated to 320Volt ... Capable of breaking 2000Amp ... x3 ($300)

Circuit Breaker ... Airpax JLE-1-1-53-3-B4-250 ... Rated to 160Volt 800A Trip ... x2 ($590)
4x Panel Meters ... 500Volt, 1000Amp, 50Volt, 20Amp with shunts ... ($250) ... These will be used to monitor the 12V and 156V circuits.

2x Solid State Relays ... Rated to 250Volt 40A DC ... ($40) ... These are used to control the high voltage devices like an electric heater core.

DC-DC Converter ... Rated 144-288Volt to 12-15Volt 486Watt ... Purchased from evpower.com.au ... ($306)

12 Volt Vacuum kit for Power assisted brakes ... Purchased from KTA Services ...

Potentiometer ... Curtis PB-6 ... Purchased from KTA Services ...


Wednesday, June 17, 2009

12V Testing and the Motor

May 2009 ... Plugging a 12V power supply back into the 300ZX I started testing the 12 Volt equipment in the car to see what needed attention.

Headlights ... Worked
Indicators ... Worked
Windscreen Wipers ... Worked
Cabin Fan ... Needed to ensure all sensors were reconnected ... but finally worked

The horn still needs attention
Removing the ECU and the ECU/Engine wiring harness hasn't affected any of the 12V equipment ... That was a huge relief !!!


The Motor:

I have also decided on a motor ... ... Originally I was looking at a Netgain Warp11 Series DC motor specifically "designed" for electric vehicle use.
From the research i've done ... this was the motor to get for a performance DC conversion ...

A standard Series DC motor of this size is normally rated at about 48Volt. Whereas a performance EV conversion requires a motor to be run at 120 Volt+. A DC motor is generally capable of running at a much higher voltage than it is rated, but with such an increase in voltage causes arcing on the motor's brushes (which is a bad thing) ... These Netgain Warp motors are shipped with the brushes pre-advanced to prevent this arcing. There are many happy EVers out there using these motors, so it seemed like the way to go. But for AUD$5500 this wasn't a decision to be taken lightly.


After much thought I decided to take another track ... I sourced a similar series DC motor, from a second hand forklift recycler in the US. (I did try and find one in Australia but forklift recyclers I spoke with hadn't heard of a 10" or 11" DC Forklift motor.
This is the 11.5" 120kg Clark Series DC forklift motor. As far as the "experts" have commented ... It has potentially the same power capacity of the $5500 Netgain Warp 11 motor, at a fraction of the price. Bought for AUD$500 plus $830 delivery and best of all "no duty" was needing to be paid. I'm taking a bit of a gamble with an unproven motor, but this will save my budget $$$

Once received, the motor appeared to be in pretty good condition, with good sized brushes and a good ammount of comm bars. ... ... I haven't had a chance to power it up though (remember to only use 12V on a motor without any load) and since i'm looking at a 156Volt conversion, i'll have to look into advancing the brushes also. Better info on brush advancement can be found here http://www.hitorqueelectric.com/


The only other downside with this motor I could see was it only had one shaft, unlike the Warp11 having double shafts. One shaft needs to be connected to the gearbox and quite often you can use the second shaft at the front of the motor to power accessories like Air Conditioning or a RPM sensor. Well, this made my mind up about another variable ... I was wanting to lose the Air Con equipment to make better room for the batteries and now with no extra shaft to connect the compressor to, it was a no brainer ... ... all Air Con lines, Condensor and Radiator have also now been removed.

Further Removal of Parts

March - April 2009 i spent further removing parts off the 300ZX and selling them to clear room in the backyard.

Engine and boxes of junk ... ... Gone

Intercoolers ... Gone

Fuel Tank ... ... Gone

Fuel Lines and HICAS Steering Lines ... ... Gone

Radiators ... ... Gone

Power Steering Pump ... ... Gone

Starter Motor ... ... Gone

ECU and wiring harness ... ... Gone

Exhaust Pipes ... ... Gone

Clutch Pedal, and Master Cylinder ... ... Removed but not sold yet

Alternator ... ... Removed but probably won't sell

Skin off my knuckles ... ... Gone

Oil patches on the concrete ... ... Gone


Things I kept were:

Gearbox

Tailshaft

Engine Mounts

Clutch Disc from Motor (might be needed for motor coupler)

All Air Con Equipment and Pipes(don't know if it will stay or go yet)

All Brake components
All Power steering components (except the pump)
The engine bay looks very bare now ... ... Oh, I managed to find my label maker too.
Removing of all these items would have taken the 300ZX from 1600kg to about 1200kg.
It also returned about $1000 to my budget !!!

Engine & Gearbox Removal

February 2009 was spent removing the motor and gearbox before the 300ZX was brought home.

As you might be able to tell from the photo, There is alot crammed into these cars
It's not an easy job Internal Combustion Engines (ICE) have of turning petrol into hydrocarbons, nitrogen oxide, carbon monoxide, sulfur dioxide and other hazardous air pollutants ... all while creating large amounts of heat and noise ... Oh yeah ... and powering the vehicle.

The ICE also makes a far better step stool than an electric one would anyday.

I'm glad I don't have to put any of this junk back in ... (because I forgot my label maker at home)

OK, Here's some wires ... which one do I plug the electric motor into ???

With my limited mechanical knowledge when it comes to cars ... It pays to have a qualified Nissan Mechanic as a brother-in-law ... ... (Thanks Nicko ... getting the motor out of this thing was no small task, but it was enough to get the wheels turning "so to speak")
The gearbox and tailshaft came out too ... but i'll be keeping these for later

Time for a quick budget

It was January 2009 when I started this project .... and it began with a "very" rough budget.


Donor Car ... $3000


Motor ... $5500 (I decided on a larger 11" Series DC motor after weighing up the cost and availability and potential gain of AC setups available)


Controller ... $2000 (still undecided, but determined to get one larger than the Curtis 500Amp 1231C


Batteries ... $600 (I had been given hundreds of 9Ah 12Volt VRSLA batteries from a friendly courier driver that swapped them out in UPS') They were all second hand and needed to be disposed of. Hopefully I will be able to use these batteries for 12 Months to get the project running before needing to price up a Lithium pack. (Thanks Phil)
Battery Charger $3000 (Still undecided)
Motor Coupler & Adapter Plate $1000
Potentiometer $200
DC-DC $300
Vacuum Pump $400
Power Steering Pump $400
Contactors $300
Circuit Breaker $200
Gauges $300
Cable & other Electronics I haven't thought of $1000
Welding for Engine Mounts and Battery Boxes $1000
Certifying for Road Use $1000
Total of AUD$20200 .... Ouch !!!
I was hoping for a budget more like $10K ... But then I might be able to source some of these items cheaper when the time comes.
This project may take a bit longer than I originally thought.

So What Goes Into an Electric Car ?

I'm not going to go into detail on the specifications required for different vehicle builds, and the performance of different components ... (that's what Google is for)
A basic install will need the following.

The Electric Motor:

-A regular petrol engine could be ~30% efficient at turning fuel into actual energy, with energy lost as heat and noise ... whereas an electric motor can be 80-90% efficient at converting energy. -A regular petrol engine is power rated for its "peak" power at a given rpm, whereas many electric motors are rated at their continuous duty

Therefore a much smaller and lighter electric motor can be used to supply the same performance to a vehicle than its originally supplied engine.
The Controller:

An electronic device needed to adjust voltage etc ... supply to the motor. To ??? You guessed it ... "control the motor"

The Potentiometer:

Is basically an adjustable resistor which you can connect your standard throttle cable to. The potentiometer will send a signal to the controller telling it how much power to supply.


Batteries:

The "Achilles' Heel" of the electric cars. This is where your power (fuel) is stored. Varying battery chemistry, voltages and capacity will provide varying results for your electric vehicle. Battery technology is constantly being developed with prices dropping constantly ... I saw someone mention recently that with three factors of an electric vehicle "Cheap" Range" & "Power", you can only choose two of these. This is true due to current battery technology.


DC-DC Converter:

This is used to replace the alternator on a petrol motor ... The DC-DC converter will change the high voltage of your main battery pack to 12V to power standard car accessories like lights, windscreen wipers, radio etc. (Or can be used to charge a separate 12V battery which powers these accessories)

Vacuum Pump:

Vacuum created from a standard petrol engine is used for "power assisted brakes" ...Without the petrol engine, this vacuum need to be created to return the brakes to their original working capacity ... A 12 Volt Vacuum pump and reservoir can be sourced as a kit if required.


Power Steering Pump:

Most vehicles use a power steering pump which is belt attached to the petrol engine. But there are many vehicles which are factory built with 12 Volt electric power steering pumps like the Toyota MR2 and Holden Astra Mk4 to mention a couple. One of these power steering pumps can be easily adapted for an electric vehicle.


Battery Charger:

Usually mounted in the vehicle so you can charge from any power point.


Adapter Plate & Coupler:

Used to attach an electric motor to the vehicles existing gearbox. (usually has to be custom fabricated which means $$$)


Gauges and Meters:


Used to measure the power consumption and/or remaining battery capacity


Contactor:

A contactor is basically a high voltage relay or switch. It is used to turn on the main power to your controller.


Circuit Breakers or Fuses:

Used to protect the electrical circuit against surges, shorts or for safety cutoffs.


Power Cable:

Power cable for an electric vehicle needs to be much larger than any standard automotive cable.
Sizes of 2/0 or 4/0 AWG, multistrand double insulated welding cable is capable of handling the amps required for an electric vehicle. (500A plus)

Tuesday, June 16, 2009

The Star of the Show


Introducing the star of the show ...

My 206kW, 1600kg, twin turbo, rear wheel drive, 18 L/100km, 1990 4 seat Nissan 300ZX.

Specs for the 300Z can be found here ... http://en.wikipedia.org/wiki/300zx


The Project:


To disband with the gas guzzler twin turbo motor and turn the car into an on road, daily driving one of these ...


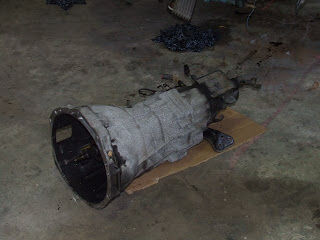
Well, not quite ... but the plans are for an electric powered street vehicle with comparative acceleration to a stock standard 300ZX.


Nooooo !!! ... ... ... I can hear all the Nissan sport car drivers crying already ... But it's too late now ... This car isn't going to know what hit it.


A little bit about myself ...


My name is John ... I'm 31 years old ... I live in Brisbane Australia ... I currently work for a freight forwarding company ... and i'm into any form of sustainable technology or living. Whether it be electric cars to wind turbines, growing your own vegetables to mud brick houses ... chances are I've researched it in depth.


I believe electric cars (and high speed electric rail) are the future for transport. But i'm not prepared to wait for the government or the car manufacturers to offer their solution with an unknown pricetag.


The Chevrolet Volt ... Production Due 2010 ??? ... Release into Australia ??? ... Pricetag US40,000 ??? ... http://en.wikipedia.org/wiki/Chevrolet_Volt

Motivation / Inspiration:

Came from a 3 month work assignment in Perth, with nothing but sight seeing and the hotel room internet as entertainment ... (Thanks Jamie) ...

Watching the documentary "Who Killed the Electric Car" and stumbling accross kiwiev.com


How:

I have an IT (hardware and software) background ... I have limited knowledge when it comes to vehicle maintenance and no fabrication experience.

I'm fairly practical by nature ... I try my hand at home renovations and small domestic building projects. If I can see something assembled, I'll have a go at building it myself (although disassembly was my specialty when I was younger)

However, I understand the basics of electronics (I know how to read a wiring diagram and know how to use a set of jumper cables)

So how hard could it be ??? It's just like an overgrown remote control car ... Right ???