I'm not going to go into detail on the specifications required for different vehicle builds, and the performance of different components ... (that's what Google is for)
A basic install will need the following.

The Electric Motor:
-A regular petrol engine could be ~30% efficient at turning fuel into actual energy, with energy lost as heat and noise ... whereas an electric motor can be 80-90% efficient at converting energy. -A regular petrol engine is power rated for its "peak" power at a given rpm, whereas many electric motors are rated at their continuous duty
Therefore a much smaller and lighter electric motor can be used to supply the same performance to a vehicle than its originally supplied engine.

The Controller:
An electronic device needed to adjust voltage etc ... supply to the motor. To ??? You guessed it ... "control the motor"
 The Potentiometer:
Is basically an adjustable resistor which you can connect your standard throttle cable to. The potentiometer will send a signal to the controller telling it how much power to supply.

Batteries:
The "Achilles' Heel" of the electric cars. This is where your power (fuel) is stored. Varying battery chemistry, voltages and capacity will provide varying results for your electric vehicle. Battery technology is constantly being developed with prices dropping constantly ... I saw someone mention recently that with three factors of an electric vehicle "Cheap" Range" & "Power", you can only choose two of these. This is true due to current battery technology.

DC-DC Converter:
This is used to replace the alternator on a petrol motor ... The DC-DC converter will change the high voltage of your main battery pack to 12V to power standard car accessories like lights, windscreen wipers, radio etc. (Or can be used to charge a separate 12V battery which powers these accessories)
 Vacuum Pump:
Vacuum created from a standard petrol engine is used for "power assisted brakes" ...Without the petrol engine, this vacuum need to be created to return the brakes to their original working capacity ... A 12 Volt Vacuum pump and reservoir can be sourced as a kit if required.
 Power Steering Pump:
Most vehicles use a power steering pump which is belt attached to the petrol engine. But there are many vehicles which are factory built with 12 Volt electric power steering pumps like the Toyota MR2 and Holden Astra Mk4 to mention a couple. One of these power steering pumps can be easily adapted for an electric vehicle.

Battery Charger:
Usually mounted in the vehicle so you can charge from any power point.

Adapter Plate & Coupler:
Used to attach an electric motor to the vehicles existing gearbox. (usually has to be custom fabricated which means $$$)

Gauges and Meters:
Used to measure the power consumption and/or remaining battery capacity

Contactor:
A contactor is basically a high voltage relay or switch. It is used to turn on the main power to your controller.
 Circuit Breakers or Fuses:
Used to protect the electrical circuit against surges, shorts or for safety cutoffs.
 Power Cable:
Power cable for an electric vehicle needs to be much larger than any standard automotive cable.
Sizes of 2/0 or 4/0 AWG, multistrand double insulated welding cable is capable of handling the amps required for an electric vehicle. (500A plus)

 Then:
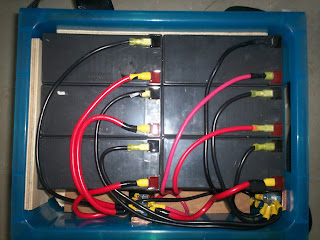
Then: Basically what this unit does is the car battery 12V positive power goes in one end ... runs through the shunt ... splits in 3 (the 3 large bolts on top) for the power steering, vacuum brake booster and remainder of the car. All while keeping my DC-DC converter and relays away from any dirt under the bonnet.


 Mounted on a plywood face plate, I have installed the LCD Meters and an array of illuminated switches which will control the gauges, main power, heater core, power steering pump and vacuum pump. i have also wired all this to a detachable plug and a custom wiring harness.
 Pictured here is the original 300zx "under dash" heater core and a timber frame i made with the same dimensions.
 Thanks to kiwiev.com for the idea ... which is to use a 1600Watt ceramic heater core from a $20 fan heater.
 Pictured here is my second attempt at this heater core. I still have more testing that needs to be done before I will feel safe about mounting this back under the dash.


 From the research i've done ... this was the motor to get for a performance DC conversion ...
 This is the 11.5" 120kg Clark Series DC forklift motor. As far as the "experts" have commented ... It has potentially the same power capacity of the $5500 Netgain Warp 11 motor, at a fraction of the price. Bought for AUD$500 plus $830 delivery and best of all "no duty" was needing to be paid. I'm taking a bit of a gamble with an unproven motor, but this will save my budget $$$
 Once received, the motor appeared to be in pretty good condition, with good sized brushes and a good ammount of comm bars. ... ... I haven't had a chance to power it up though (remember to only use 12V on a motor without any load) and since i'm looking at a 156Volt conversion, i'll have to look into advancing the brushes also. Better info on brush advancement can be found here
 Engine and boxes of junk ... ... Gone
 The engine bay looks very bare now ... ... Oh, I managed to find my label maker too.
 It's not an easy job Internal Combustion Engines (ICE) have of turning petrol into hydrocarbons, nitrogen oxide, carbon monoxide, sulfur dioxide and other hazardous air pollutants ... all while creating large amounts of heat and noise ... Oh yeah ... and powering the vehicle.
 The ICE also makes a far better step stool than an electric one would anyday.
 I'm glad I don't have to put any of this junk back in ... (because I forgot my label maker at home)
 With my limited mechanical knowledge when it comes to cars ... It pays to have a qualified Nissan Mechanic as a brother-in-law ... ... (Thanks Nicko ... getting the motor out of this thing was no small task, but it was enough to get the wheels turning "so to speak")
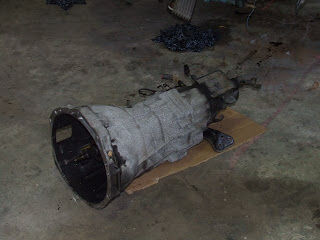
 The gearbox and tailshaft came out too ... but i'll be keeping these for later